Girl + Fire = Food
EMPTY SPACE

Pages

EMPTY SPACE
Showing posts with label cooking for one. Show all posts

Friday, March 23, 2012

Simple No-Mayo Tuna Salad

Ordering tuna salad is always a bit tricky. First it has mayo. Icky. Then there's usually the demon cardboard vegetable celery in it. More ick. Truthfully, the mere thought of it turns me off to food completely.

To avoid all that nonsense, I make my own, which is better than any I've ever had. I know that sounds terribly arrogant. But I don't like eating the same thing on a daily basis and I've eaten this for the last 4 days. No kidding. I've craved it like a fiend.

Put it between two slices of bread and it's a special sandwich. Wrap it in lettuce or mix it with quinoa, even better. Eat it straight, simply delicious.

But if there's no mayonnaise, what holds it together? I routinely substitute Greek yogurt for mayo in everything else, so this is no different. And, of course, Dijon mustard. Without mustard, life is far too bland. Add in cucumbers for crunch and capers for a sour bite, and you have yourself tuna salad without the ick.

Unless you simply don't like tuna, then there's no hope for you.


Add in a roasted pepper and you'll have a colorful plate. Or banana peppers. And pickles for even more sour crunch. But this right here, as is, it's as close to perfection as I've ever gotten in my own kitchen.

Which is saying a lot about a mere tuna salad.

This is a single serving recipe but scales easily.


print recipe

No Mayo Tuna Salad
A delicious combination of briny capers, crispy cucumbers, and fleshy tuna married with Dijon mustard and yogurt.
Ingredients
  • 1 5-oz can of tuna in water, drained
  • 1 egg, hard boiled
  • 1/2 cucumber, peeled and diced
  • 1/4 cup Greek yogurt
  • 2 tablespoons Dijon mustard
  • Juice of 1/2 lime
  • 1 tablespoon capers
  • 1 tablespoon fresh chives, chopped
Instructions
In a bowl, mix together all the ingredients. Serve in a sandwich, a wrap, or with crackers.

Yield: 1 serving

Thursday, September 15, 2011

BBQ Chicken Harissa Caramel Pizza

This pizza was a true concoction of simply what was in the fridge. It was just after our Labor Day barbecue and I had leftover chicken. And there was that delicious harissa caramel sauce. Mmm.

Once I learned Dorothy's trick for caramelized onions, they became a kitchen staple. Same with the roasted tomatoes (this bruschetta is a base for many meals in this house these days). So, of course, they were in the fridge and given an invitation to the pizza party. Because caramel and caramelized veggies just meld so damn well.

This experiment was good just by itself, with a little oregano sprinkled on top. And then I squeezed some lemon on it and WOW. I had invented my new favorite pizza.


It was a little sweet, sour, tangy, and all around perfect. With oozy cheese. Mmmm, oozy cheese!

I was making petite pies, enough for just one, but use more dough and a bit more of all the ingredients, and you can have a big ol' pizza pie.


print recipe

BBQ Chicken Harissa Caramel Pizza
A delightful blend of yumminess.
Ingredients
  • 1 package personal size pizza dough or 2 ounces of a dough ball
  • 1/2 cup shredded barbecued chicken
  • 1/2 cup shredded mozzarella
  • 1/4 cup caramel harissa sauce 
  • 1/4 cup caramelized onions
  • 1/4 cup roasted grape tomatoes, marinated in balsamic vinegar
  • 1/2 teaspoon dried oregano
  • Juice of half a lemon
  • Olive oil for brushing on dough
  • Cornmeal or flour for sprinkling
Instructions
1. Follow the directions for resting the pizza dough and preheating the oven.2. Spread the dough out to the desired thickness. Sprinkle flour or cornmeal on a baking sheet and place the dough on top.3. Brush the dough with olive oil to keep the dough from getting soggy from the ingredients, then sprinkle with about half the cheese.4. In a small bowl mix the harissa caramel with the shredded chicken and spread over the cheese. Add the tomatoes and onions. Cover with the remaining cheese.5. Put the pizza in the oven and bake until the cheese is bubbly and the dough is browned, about 10-15 minutes.6. Remove from oven, sprinkle with oregano and the lemon juice. Cut and eat.
Details
Prep time: Cook time: Total time: Yield: 1 personal size pizza

Tuesday, September 13, 2011

Roasted Mushroom and Cauliflower Pizza

I spent a week making pizza almost every night because a ball of dough makes a lot of personal pizzas. I took the opportunity to experiment with a bunch of different toppings based on whatever was in the kitchen. It was fun.

This particular pie was inspired by Pamela of My Man's Belly. She had posted a pizza recipe using roasted mushrooms. I'd never thought about roasting mushrooms, but the idea intrigued me. I was out of shallots so I couldn't make her exact recipe, but I did have roasted cauliflower which, if you've been reading for any amount of time you know, is the only way I'll eat it.

I know that roasted cauliflower on a pizza sounds odd. But add in some shredded mozzarella, spinach sauteed with garlic, a little adobo seasoning, and 10 minutes later there was a pizza waiting to be devoured.

I used crimini mushrooms, but just about any mushrooms should work. Pamela used a mix. Do whatever you like!


So simple, yet so delicious. Thanks to Pamela for her inspiration. Turns out that roasted mushrooms are really good in lots of dishes!


print recipe

Roasted Mushroom & Cauliflower Pizza
Roasted veggies on a pizza pie.
Ingredients
  • 1 package personal size pizza dough or 2 ounces of a dough ball
  • 1 pint crimini mushrooms, chopped
  • 1 cup roasted cauliflower florets
  • 2 cloves garlic, minced
  • 2 cups spinach, packed
  • 2 cups shredded mozzarella
  • 3 tablespoons olive oil, divided
  • 1 teaspoon Adobo seasoning (or regular salt & pepper)
  • Cornmeal or flour for sprinkling
Instructions
1. Follow the directions for resting the pizza dough.2. While the dough is resting, heat the oven to 400 degrees. Toss the mushrooms and cauliflower with 2 tablespoons of olive oil and seasoning. Line a baking sheet with foil and spread the mushrooms and cauliflower out evenly. Roast for 20 minutes. Mushrooms will turn a deep brown and the florets will look burntdon't worry, they're supposed to! (If using a pizza stone, put it on the lowest rack while the vegetables are roasting.)3. While the vegetables are roasting, heat the remaining tablespoon of olive oil. Sauté the minced garlic but don't let it burn, about 1 minute. Add the spinach and sauté for a few minutes, until it wilts slightly. Remove from heat.4. Remove the pizza stone (if using). Check the instructions on the pizza dough and adjust the temperature accordingly.5. Spread the dough out to the desired thickness. Sprinkle flour or cornmeal on a baking sheet or the pizza stone (if using) and place the dough on top.6. Sprinkle half the cheese all over the dough. Add the vegetables, then the remaining cheese.7. Put the pizza in the oven and bake until the cheese is bubbly and the dough is browned, about 10-15 minutes.8. Remove from oven, slice, and eat.
Details
Prep time: 20 minutesCook time:  10-15 minutesTotal time: 30-35 minutesYield: 1 personal size pizza

Friday, August 12, 2011

Marinated Roasted Tomato Bruschetta

This kitchen experiment was inspired by an appetizer I had at my birthday dinner at the Hard Rock Cafe earlier this year. They're turning all of 40 this year, did you know? I turned not-40 and was blown away by their bruschetta.

The secret to their dish is that they marinate the tomatoes in balsamic vinegar. Delicious, sour balsamic vinegar. Mmmm.

Ever since learning to turn tomatoes into raisins, I've been wanting to see how that would work in bruschetta. Balsamic-soaked, roasted grape tomatoes are perfect on their own. Throw them in salads, sandwiches, eat them by the handful. But marry them with cilantro and shallots, then add them to grilled bread? Hot. Damn.

Growing up here in not-Italy, I was under the impression that bruschetta is the toppings on the toasty bread. Turns out that's not true. The word bruschetta is derived from the Italian word that means to roast over coals. So those bottles labeled bruschetta are both lying to you and cheating you out of a really great fresh toasted and roasted dish. Don't buy them. Make this instead.

First you roast tomatoes, then marinate them in balsamic vinegar and a bit of olive oil overnight. Or, if you're like me and dare to forget they're in the fridge, let them sit for a week! Hell, just store them in the balsamic after cooking. You can reduce the marinade later and use it as a glaze or salad dressing.

Once you've waited long enough for the tomatoes soak up their tasty sourness, chop up a shallot and some cilantro. Mix them all in the the marinade. Then toast some sliced crusty bread and rub it with garlic. Top with a good Parmesan or an Italian truffle cheese. Enjoy your sexy dish.

Then stuff it in your pie hole.


The instructions below will give you enough for 1 person (about 5-6 slices). Scale as necessary.


print recipe
Marinated Roasted Tomato Bruschetta
Ingredients
  • 1 large French dinner roll (or any crusty bread)
  • 1/4 cup olive oil
  • 1/2 cup roasted grape tomatoes, soaked in balsamic marinade
  • 1 small shallot, finely chopped
  • 1/4 cup loosely packed cilantro, chopped
  • salt and pepper, to taste
  • Italian truffle cheese
Instructions
1. Roast grape tomatoes according to directions. Cover in balsamic vinegar and a dash of olive oil. Marinate overnight (or longer).2. Cut bread into 3/4-inch slices on the bias. Brush with olive oil and bake oil side up at 350° for 10-12 minutes or until golden brown. Allow to cool then rub with a cut clove of garlic (or a whole head cut in half--it covers more surface area).2a. You could also simply toast the bread under the broiler, in the toaster, or on the grill.3. Add shallot and cilantro to the tomato marinade and mix well. Add salt and pepper to taste (if you find it necessary, this is optional).4. Spoon the mixture onto each bread slice and top with a bit of grated cheese.
Try not to devour it all at once. You don't want to choke.


Yield: 5-6 slices

Monday, March 28, 2011

Liz Taylor's Chicken

Last week, we lost Elizabeth Taylor. She of the acid wit displayed in cinematic classics Cleopatra, Who's Afraid of Virginia Woolf? and The Taming of the Shrew. She was force to be reckoned with, an enigmatic movie star of the highest caliber, and a foodie.

Immediately the food sites all posted and reposted a recipe called Elizabeth Taylor's Chicken Steamed In Wine. None could verify it was actually created by the silver screen queen. It is hard to imagine the glamorous Cleopatra in the kitchen whipping up chicken recipes, but it sounded good. I want to believe she cooked while wearing her signature white diamonds. "These have always brought me luck…"

You might expect a dish linked to a woman with Liz Taylor's reputation to follow suit: strong flavored, exotic, with a hint of spice. Maybe even a little unforgiving. You won't find that here. It's simple chicken-in-white-wine-sauce fare. And it's super easy.

The recipe calls for a whole chicken. If you're a busy girl like me, cooking for one, there's no need to suffer an hour of simmering an entire chicken. One breast or thighor better yet, cutletscut the time significantly. A nice dry white (a $10 Bordeaux from Trader Joe's made it into this dish and into a glass for the cook. I was thirsty...), some garlic, onions, bay leaves and other aromatics, salt and pepper, and you're done.

I even whipped up a little white wine reduction, and threw some rice in it. DELICIOUS.


A note about the wine: Sauternes wine is from a specific blend of French grapes (similar to Bordeaux wines, but in a different ratio). Sauterne (no S on the end) wine refers to any number of California whites. More about the difference between the two can be found here. Note the recipe calls for a dry white, not a dessert wine. The 2009 Mouton-Cadet Bordeaux I found at Trader Joe's was inexpensive, dry, and excellent on its own.  


print recipe
Liz Taylor's White Wine Chicken,
Based on the unverified Elizabeth Taylor's Chicken Steamed in Wine recipe.

Ingredients
1 chicken thigh, cut into pieces
1 tablespoon olive oil
1 small shallot, sliced
1 clove garlic, minced
2 bay leaves
1 tablespoon dried crushed mint
1 tablespoon dried crushed oregano
1/4 teaspoon salt
2 dashes black pepper
1 cup dry sauterne wine (or other dry white)
Instructions
1. In a sauté pan, heat the olive oil over high heat until shimmering and quickly sear the chicken.

2. Combine all the other ingredients and pour over the chicken.

3. Cover and simmer for about 10 minutes, or until chicken is fully cooked through.

4. Remove chicken mixture to plate and discard the bay leaves. Return the pan to low heat, add about 1/4 cup of wine. Scrape up any chicken bits from the bottom of the pan and simmer until reduced by half. Pour reduction over chicken.


Yield: 2 servings

Tuesday, February 15, 2011

Sweet Smoked Paprika Chicken

Picture courtesy of Erika Kerekes,
LA Cooking Examiner
To continue on our theme of Red Food Week, I finally took a picture of Erika Kerekes' Broiled Boneless Chicken Thighs with Garlic Salt and Smoked Paprika before eating it.

I've made this dish only about a billion times. The reason is that there are all of 3 steps, so it's foolproof and perfect for a) lazy nights, b) late nights, or c) "I ain't got time for this" nights. And also days.

Seriously, 3 steps:
1. Coat chicken with paprika and garlic salt.
2. Broil for 7 minutes on each side.
3. Eat.

See? Easy.

Okay, so they come out more orange than red. But paprika is red, so there.

Erika recommends using smoked paprika, which is "available at Surfas and, now, at Costco, much to the delight of Los Angeles chefs everywhere." Surfas, which is a place I do love, can be pricey and I never have the patience for Costco, but I did have regular boring paprika and a sweet smoked paprika thanks to an overindulgent shopping trip at the lovely Silverlake outpost Spice Station (they also sell truffle salt for $10 per ounce, which is COMPLETELY worth it [and the indulgent part of the shopping trip]!).

Sweet smoked paprika is wonderful on the chicken. The thighs remain juicy even after 14 minutes in broil mode. And they come out sweet, and smokey, and plain ol' delicious.

Since most of my a) lazy nights, b) late nights, or c) "I ain't got time for this" nights (and days) usually also mean dinner for one, this recipe scales down nicely too. Take one chicken thigh, coat it with salt and paprika, broil, and done. Make 2 and you have lunch the next day.

Erika also recommends using more salt than you think you need. If you're on a reduced-salt diet, you can go easy on it, but she does make the point that you'll still be ingesting less sodium than a typical restaurant dish. Tonight I used a 3:1 paprika to salt ratio and it was fine.


The modified recipe:

Sweet Smoked Paprika Chicken
yields 1 serving

1 boneless skinless chicken thigh
2 tablespoons garlic salt
1 tablespoon each regular paprika and sweet smoked paprika

1. Preheat the broiler to high and place an oven rack 4 inches below the flame. (If you put the rack right under the flame, the chicken will burn before it cooks through.)

2. Line a baking sheet with foil and lay the chicken thighs out flat. Sprinkle each side generously with the garlic salt and paprika. (The measurements above are merely guidelines, use more as needed, and don't skimp on the salt!)

3. Broil the chicken about 7 minutes on each side, until the thighs are cooked through and have developed a nice crust (or as I like to put it, a yummy black char). Serve with some veggies or rice and eat immediately.

Thanks to Erika for providing us with a easy meal!

Monday, January 10, 2011

Five Spice Chicken

On occasion I lounge on the couch and make myself hungry by watching cooking shows. This is undoubtedly a form of masochism. I'm selective, though. I love Paula Deen, her cookware, and her adorable southern gentlemen sons, but I can't live on butter. I can, however, live on stir fried chicken.

Enter Chinese Food Made Easy, with Ching-He Huang. She's an adorable teeny thing with a British accent and just a hint of snark. I love Chinese food. So when the episode of her massaging chicken before making chow mein came on, and she made it look so easy, I had to try it.

The very first time I made it, I cheated. I didn't make the whole noodle part of the dish. I didn't have them in the house, but I did have all the fixins for the chicken. And I really wanted to massage the spices into it like Ching did.

It really is ridiculously easy to make this dish. I've since made it about three times (once with actual noodlesbut it's the chicken that's the real star of the meal) Take some chicken strips, add the spices, heat up the oil, and you're eating in 5 minutes. Add some veggies because they're good for you, and you have a complete meal.

The original recipe lists the chile sauce as optional. Man up and throw some in, even if it's just a quarter-teaspoon. You'll appreciate the tiny kick of heat and additional depth of flavor.


Five Spice Chicken
adapted from Ching-He Huang's Chicken Chow Mein
yields 1 serving

1 skinless chicken breast, sliced into strips
1 tablespoon soy sauce
1 teaspoon five-spice powder
1 teaspoon chile sauce
1 tablepoon sesame oil
1 red bell pepper, seeded and finely sliced

1. In a small bowl, combine the chicken with the soy sauce, five spice powder, and chile sauce. Using your hands, ensure the chicken is completely coated. (Give the poor chicken a good massage. It's stressed.)

2. Heat the sesame oil in a wok or large skillet. Once it begins to smoke, add the chicken strips and stir fry for about 2-3 minutes, until cooked through.

3. Add the bell peppers and cook for another minute. Serve immediately.

Ching's recipe also called for bean sprouts. I like adding in some enoki mushrooms. They taste better than bean sprouts (where better = not like dirt). You do whatever you need to get more veggies in your diet.

Friday, September 24, 2010

Quinoa Cereal

Quinoa is one of those magical protein-rich foods that dates back to the Inca civilization of pre-Hispanic Peru. The first time I had it I couldn't stand it. But that's because I was trying to make some sort of stew with spinach and it failed in every which way.

I finally learned how to cook it properly (hint: don't drown it in chicken broth like I did the first time) and now it has replaced rice in my kitchen. It basically cooks the same way: 1 part quinoa to 2 parts liquid. And since I usually make it to pair with meat, that liquid could be water or any number of broths. But when I decided to boil it in milk, that's when I realized what a great breakfast cereal this could be.

In a word: delicious. And a single bowl has so many nutrients, you may never die should you eat this regularly. Ok, that's a lie, but the health benefits are laid out in plain English on The World's Healthiest Foods.

A single serving is a quarter cup. Boil that up in the morning with your favorite type of milk (I like unsweetened almond milk), throw in some fruit, and you have breakfast:


Though I'd never seen a recipe call for this preparation, I know I couldn't be alone in my breakfast-y application. The very first time I made this, I went searching for other like-minded folks and found Sarah of Food Cite. Like me, she is trying to avoid death by cooking quinoa as often as possible.

Quinoa Cereal
yields 1 serving

1/4 cup quinoa
1/2 cup milk (rice, almond, cow, etc.)
Sugar or honey (optional)

1. Rinse the quinoa until the water runs clear. This helps remove some of the bitterness.

2. Place quinoa and milk in a small sauce pan and bring to boil. Simmer uncovered until all liquid is absorbed (about 5-10 minutes).

3. Serve piping hot and steam your pores at the same time. Or cool to a non-lethal temperature and sprinkle or drizzle in your sweetener of choice (if using, I find the almond milk has just enough natural sweetness).

This goes especially well topped with a sweet mango. Or bananas. Or blueberries. Pick a fresh fruit. You really can't go wrong.

The recipe doubles and triples really easily. Simply keep the 1:2 ratio of quinoa to liquid. Cooking time will increase as well. 2 cups of quinoa in 4 cups of milk will take about 15 minutes.

Wednesday, July 21, 2010

Caramelized Scallops on a Wonton Tostada

Today's dinner was courtesy of Food Gal's Thomas Keller "Ad Hoc at Home" preview, with some inspiration drawn from Brian Boitano's scallops with mango and avocado. Who knew Brian Boitano cooked, right?

I had no idea scallops could be caramelized. I'm always afraid of overcooking them. That happened to me once in a teppanyaki restaurant and it was so very disappointing. Rubber seafood is about as bad as it comes. Worse than rubber chicken.

Reading through Food Gal's comments I found that the original recipe of 10 total of water cups and the cup of salt could be halved, especially since I was only making a small test batch just for me. I pretty much followed the directions exactly, except for using table salt (at a ratio of 2/3 cup of table salt = 1 cup kosher salt) and only having the 4 scallops instead of a pound. I also cooked them in a cast iron skillet. They came out perfectly.

It's important to note that if you attempt this dish, you should definitely read Food Gal's post first. She does a great job explaining the entire recipe.

As for the mango/avocado/wonton piece of the puzzle, I upped the Mexican factor on this. Hence the "tostada" part of the title. Brian's recipe was a great start, but I didn't want to use coconut milk. It's super fatty and I wanted something a bit more savory. In keeping with the Mexican theme, I opted for Mexican crema, which is similar to sour cream, but more liquid-like. And instead of the recommended Sriracha, I subbed in adobo sauce. Adobo (not the brand name salt & pepper mix I also used) is the sauce that canned chipotles live in. Depending on your heat tolerance, a little goes a long way. (Both Adobo and canned chipotle are available in Hispanic markets.)

This was also my first time making clarified butter for the sear. It's readily available in southeast Asian stores, but it's so simple to make, and I only needed a small amount, that I tried my hand at it. For details on how to make it, see the Asia Recipe website.

Finally, I didn't see the point in cutting the wonton wrappers into circles, so I simply fried them as squares. Yes tostadas are circular, but that's just an unnecessary step.

The sear on the scallops was unreal. And they were perfectly cooked, no rubber!

The combined recipe below was scaled down for a single serving.

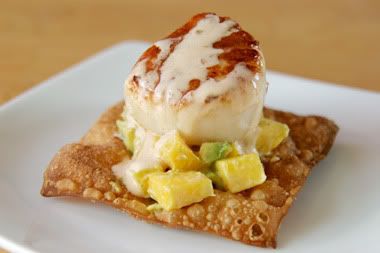
Caramelized Scallops with Mango Avocado Relish over a Wonton Tostada

1/3 cup table, plus more to taste
2 cups hot water
4 cups cold water
4 jumbo scallops, tough side muscle removed from each one
About 2 tablespoons (1 ounce) clarified butter
1/2 lemon (optional)
2 cups canola oil
4 wonton wrappers
Adobo salt & pepper mix, as needed
1/4 mango, small diced
1/4 avocado, small diced
2 tablespoons crema (Mexican sour cream)
1/2 teaspoon adobo sauce (aka chipotle sauce)
1/2 lime, juiced

1. Line a small baking sheet with paper towels. Combine the 1/3 cup salt with hot water in a large bowl, stirring to dissolve the salt. Add the cold water.

2. Add scallops to the brine and let stand for 10 minutes.

3. Drain the scallops, rinse under cold water, and arrange in a single layer on the baking sheet. Cover with more paper towels and refrigerate for 1 1/2 to 3 hours (no longer, or the quality of the scallops will be affected).

4. While scallops are resting in the fridge, work on the relish and tostadas. In a medium pot, bring 2 cups canola oil to 350 degrees F. Fry the wontons in small batches until they are brown and crispy, about 2 minutes. Drain on a plate lined with a paper towel and season each with a bit of salt.

5. In a medium bowl, combine the diced mango and avocado. In another smaller bowl, whisk together the crema, hot sauce, and lime juice, and adjust the seasoning with the salt and black pepper mix, to taste. Pour half of the creamy mixture over the mango and avocado and gently toss to coat.

6. After the 1 1/2 to 3 hour rest period, heat a generous film of clarified butter in a large cast iron frying pan over medium-high heat until it ripples and begins to smoke. Sprinkle scallops lightly with salt and add them to the pan. Cook, without moving the scallops, until bottoms are a rich golden brown, 3 to 3 1/2 minutes. Turn scallops and caramelize the second side.

7. To assemble, put 1 tablespoon of the mango and avocado mixture onto a fried wonton. Top with a caramelized scallop and finish with a squeeze of lemon juice (optional) and a drizzle of the crema sauce.

This looked like a LOT of food on the plate. But when I was done, I wanted more. I don't know if it was just too little food, or it was so good it left me wanting more. I'm going with the latter.

Tuesday, July 13, 2010

Moroccan-Inspired Braised Lamb Shank

I love lamb. I've never met a piece of lamb I didn't want to stuff directly into my mouth. I have friends who find it distasteful, because they think lambs are cute and cuddly. But lambs are not plush toys, there yummy goodness.

I've never made lamb myself. And I was in the mood for Moroccan spices, so I picked up a single shank and headed to the kitchen to experiment.

Google research led me to this recipe from the appropriately named Food & Wine Test Kitchen. I followed it almost exactly, except for a few minor substitutions: pomace oil for the olive oil, quinoa for couscous, and a deep cast-iron skillet in place of an enameled casserole. And even though the original recipe calls for 4 shanks and I was only making 1, I didn't mess with the amount of the spices. I certainly didn't want a bland dish.

Oh yeah, I also didn't chop the garden-fresh herbs. Not for any good reason, I just didn't. You can though.

The recipe looks long and complicated--it really isn't. Don't be overwhelmed by the ingredient list. The recipe is written in order for making the stew, then the quinoa as that is finishing up. I also separated the ingredient list so that it's a little easier to digest.

I like puns.


Moroccan-Inspired Braised Lamb Shank
Stew:
2 tablespoons pomace oil
1 boneless lamb shank (about 6 oz)
Salt and freshly ground pepper
1 large onion, finely chopped
2 baby carrots, finely chopped
3 garlic cloves, minced
1 teaspoon ground cumin
1/2 teaspoon ground coriander
1/2 teaspoon ground cinnamon
1/4 teaspoon ground allspice
1/4 teaspoon freshly grated nutmeg
2 tablespoons tomato paste
1 teaspoon harissa or other chile paste
2/3 cup dry red wine
One 14-ounce can whole peeled tomatoes, drained and coarsely chopped
1 cup chicken stock or canned low-sodium broth

Quinoa:
1/4 cup slivered almonds, chopped
2 tablespoons finely chopped mint
2 tablespoons chopped cilantro
1/2 cup chicken stock or canned low-sodium broth
1 tablespoon pomace oil
1 shallot, minced
1/4 cup quinoa
1 cup water
1/4 cup raisins

1. Preheat the oven to 325°. In a deep cast-iron skillet, heat 2 tablespoons of the oil. Season the shank with salt and pepper and brown in the skillet, about 3-4 minutes each side. Transfer to a plate, leaving the fat in the skillet.
 
2. Add the onion, carrots and garlic and cook over moderate heat, stirring, until lightly browned, about 3 minutes. Add the cumin, coriander, cinnamon, allspice and nutmeg and cook, stirring until lightly toasted, about 1 minute. Add the tomato paste and harissa/chile paste and cook over moderately high heat, stirring, until lightly browned, about 2 minutes. Stir in the wine and boil until reduced to a thick syrup, about 4 minutes.

3. Add the tomatoes and 1 cup of the chicken stock to the skillet. Season with salt and pepper and bring to a boil. Nestle the lamb shank in the liquid. Cover tightly and braise in the oven for about 2 hours, basting occasionally, until the meat is almost falling apart. Transfer the shank to a platter and cover with foil. Leave the oven on.
  
4. Spread the almonds in a pie pan in an even layer and toast for about 10 minutes, or until golden.
  
5. Strain the sauce into a bowl, pressing on the vegetables; skim any fat. Return the sauce to the skillet and boil over high heat until reduced to 1 cup, about 10 minutes. Return the vegetables and lamb to the sauce and keep warm.
  
6. In a small bowl, mix the mint with the cilantro and almonds and season lightly with salt and pepper.
  
7. Heat 1 tablespoon of pomace oil in a medium saucepan. Add the shallot and cook over moderately high heat until softened, about 2 minutes. Stir in the quinoa and cook until lightly browned, 2 to 3 minutes. Add the remaining 1 cup of chicken stock, the water and 1/4 teaspoon of salt and bring to a boil. Cover and let simmer until all water has been absorbed (about 10 minutes). Remove from the heat and add the raisins. Cover and let stand for 10 minutes. Fluff with a fork and stir in half of the herb-almond mixture.
  
8. Mound the quinoa in the center of a platter. Place the lamb shank next to the quinoa and spoon the sauce on top. Sprinkle with the remaining herb-almond mixture and serve.

Monday, May 24, 2010

Strawberry & Goat Cheese Pizza

It was the same old story: there were strawberries in the fridge that had to be used and I wanted to try something completely different. That led me to Savory Strawberry Pizza.

Here's some food math for you: a balsamic reduction + strawberries + goat cheese = yum. It's really that simple. I cheated by using a frozen pizza crust instead of making my own (yes, that means I poisoned myself with wheat--I'm still alive), and then just halved the recipe, more or less.


I could have cut the lettuce up a bit smaller and crumbled the cheese a bit finer, but I wasn't worried about presentation. I was more concerned about getting it into my mouth as fast as possible.
Mini Strawberry & Goat Cheese Pizza

1 7-inch frozen pizza crust
1-2 ounces goat cheese
3/4 cup of sliced strawberries
1/2 cup of greens of your choice, chopped
2 ounces balsamic vinegar, reduced to half

1. Bake the crust (approximately 10 minutes at 350 degrees, depending on your brand).

2. On warm crust smear a thin coating of goat cheese – about an ounce.

3. Toss strawberries in balsamic reduction and spread on top of cheese.

4. Bake at 400 degrees for another 10 minutes.

5. Remove from oven and top with the rest of the goat cheese.

6. Add greens (I used red leaf lettuce).

7. Drizzle entire pizza with remaining reduction.

Yields 1 serving.


I didn't even realize there were two reduction recipes on the page, I was in such a hurry to eat. I wonder what the white reduction would taste like. I love balsamic vinegar, so I was happy with what I made, but your mileage may vary.