Girl + Fire = Food
EMPTY SPACE

Pages

EMPTY SPACE
Showing posts with label Mexican. Show all posts

Sunday, March 31, 2013

Carnitas Americano

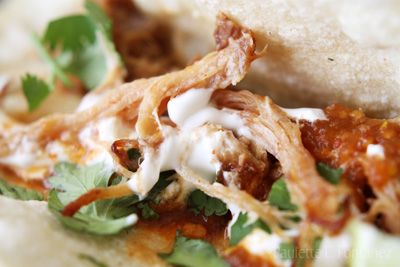
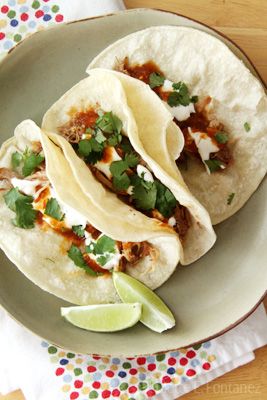
Carnitas. Until recently, I never really indulged in the succulent pork product. When it comes to Mexican food, I'm a die-hard lover of carne asada. But when I found Pinch of Yum's Easy Crockpot Carnitas, it was really too easy not to make it.

On first look, carnitas and pulled pork look very similar. They both become shredded pork. But pulled pork is smoked and carnitas are usually braised in lard. This dish is neither, it's braised in orange juice and beer. You know, good stuff.

Actually, there was a thin layer of fat on the pork shoulder (or butt, if you will) and I didn't bother trimming it, so it was braised in some fat. Just not a bucket's worth! So carnitas lite, or what I'm terming carnitas Americano. Because it seems like crockpot cooking is very much a middle America way of life.

Not to spoil the story, but I do have to establish this one thing: this was the best thing I have ever made. Ever. I amazed myself.

It was perfectly juicy and crispy. And all I did was rub a hunk of pork with salt and spices then let it cook on low for 8 hours in orange juice and Hoegaarden. Oh, I'm sure you could use a Mexican beer, but we like our Belgian wheat beers here in the G+F kitchen. When I shredded it, broiled for a few minutes its own jelly, stuffed it in a taco with sour cream, cilantro, salsa, and avocado, it was divine.

Scratch that: it was the BEST DAMN THING I ever ate. Better than truffles. Yeah, that good.

I get a little hot under the collar just thinking about it.


Get the recipe at Pinch of Yum. It halves easily (ours was only 2 pounds, bought at Sprouts Farmers Market), but you will want to go for the full 4-5 pounds. This disappears quickly!

Tuesday, August 21, 2012

Spicy Mexican Chocolate Cookies

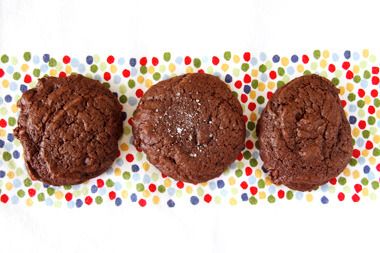
Before it got super ridiculously hot, I was doing crazy things, like baking. I don’t know what’s gotten into me, since cleaning up after baking can be soooooooo time consuming. But when I found this recipe for Mexican spiced chocolate cookies, I was intrigued. Plus, it was another opportunity to use my shiny red mixer.
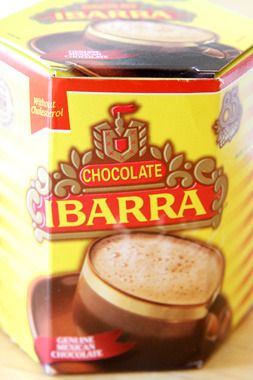
When I read through the recipe, I was dismayed that it didn’t actually call for Mexican chocolate. Come on, brown people aren’t the only ones that use cayenne and chili powder! No, what this really needed was authentic Mexican chocolate, the kind my mom used to make us hot chocolate with when I was little. Chocolate Ibarra, to be exact. The octagonally-shaped cylindrical package was a staple in our house like Nestle Quik probably was for my school mates (though we indulged in Nestle Quik too). There’s a comfort in my memories of that steaming cup of chocolate.

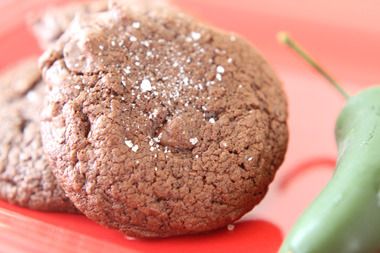
But because this is not unsweetend chocolate, I had to cut back on the sugar too (by half—though I probably could have done without it completely). I also had to double the spices because a quarter teaspoon of cayenne is child’s play. Even with that modification, they spice factor still wasn’t up to my expectations. More spices!! You can't call something "spicy" if it isn't, indeed, spicy!

This also didn’t need the additional chocolate chips, but walnuts would’ve been nice. Or spiced cacahuetes (peanuts). It was a bit of chocolate overload. Not that that is a bad thing...

The recipe calls for an entire stick of butter, so the cookies are exceptionally chewy. If you’re calorie-conscious, this isn’t the recipe for you. I suppose you could cut back, but not being a baker I’m not sure exactly how that would impact the final product. Other than giving you a slightly more brittle cookie. Diet cookies? Ick.


Finally, the cookies should be finished with a bit of sea salt. The G+F taste testers agreed the salted cookies were superior to the non-salted version. Plus, they just look prettier!


print recipe

Spicy Mexican Chocolate Cookies
Adapted from Cooking Channel's Spicy Mexican Chocolate Cookies, with real Mexican chocolate. 
Ingredients
  • 1 stick (4 ounces) unsalted butter
  • 4 ounces Chocolate Ibarra or other Mexican chocolate (available in the ethnic aisle or a Latino supermarket)
  • 1/4 cup packed brown sugar
  • 1/4 cup granulated sugar
  • 2 teaspoons vanilla extract
  • 2 large eggs
  • 1 cup all purpose flour
  • 1 tablespoon ground cinnamon
  • 1 tablespoon chili powder
  • 1 teaspoon cayenne pepper
  • 1/2 teaspoon baking soda
  • 1/2 teaspoon kosher salt
  • medium coarse grain sea salt for sprinkling
Instructions
1. Preheat the oven to 325 degrees F.2. In a heatproof bowl set over simmering water, melt the butter and chocolate together, whisking until glossy and smooth. Alternatively, the butter and chocolate can be melted in the microwave (in a microwave-safe bowl) in 25-second increments, whisking between each interval. Cool the chocolate mixture to room temperature.3. In the bowl of a stand mixer fitted with the paddle attachment (or a hand-held mixer), beat the brown sugar, granulated sugar, vanilla extract and eggs on low speed until well combined. Pour in the cooled chocolate and continue to mix until the ingredients are evenly distributed.4. In another bowl sift together the remaining dry ingredients (flour, cinnamon, chili powder, baking soda, salt and cayenne pepper). Add this to the chocolate batter and mix on low speed until just combined and no visible flour remains.5. Working in two batches, scoop 12 balls of dough (about 1 1/2 tablespoon size) onto a parchment-lined sheet pan, leaving at least 1 1/2 inches of space between each cookie (they will spread greatly). Bake the cookies, one pan at a time, for approximately 14 minutes, rotating the pan halfway through cooking time. The cookies should be puffy and still fairly soft when removed from the oven.6. Immediately slide the the parchment paper onto a wire cooling rack. Cool just a bit before serving, 5 to 10 minutes, then finish with a sprinkling of sea salt. Cookies can be stored in airtight container for up to three days.
Details
Prep time: 20 minutesCook time: 15 minutesTotal time: 35 minutesYield: 2 dozen (24 cookies)

Monday, June 27, 2011

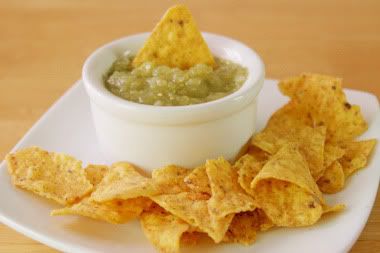
Louie's Salsa Verde

In Puerto Rico, salsa refers to the music that makes the hips shake. In Mexico, it's a condiment. In our house, it's both. But made by a Puerto Rican. And it's good.

It's a bit of a family joke that my Mexican mother cooks the greatest Puerto Rican food, but it's my Puerto Rican father who created his own salsa verde, or green salsa.

A Puerto Rican making Mexican food, and vice versa? Yeah, it's a bit like a liger.

This is my absolute favorite. I put it on everything from pasteles (not cakes) to quesadillas. It's great on hot dogs, hamburgers, scrambled eggs, to add a bit of a kick to just about anything. I like it on rice too, turns it a bit green and a bit spicy.

Of course, it's a great dip for chips.

I've taken it to two food swaps now and it always disappears quickly. I'm trying to convince my dad to market it. Till that happens, you can enjoy making it yourself.


print recipe
Louie's Salsa Verde
Our family's special recipe.
Ingredients
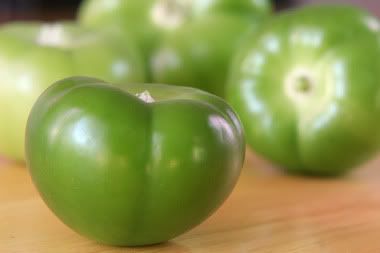
  • 1 pound tomatillos
  • 11 serrano peppers
  • 1/2 medium onion, chopped
  • 3 cloves of garlic
  • 1 yellow pepper (guero)
  • 1 long green pepper (Hungarian)
  • 3 scallions, chopped (plus 3 additional for garnish)
  • 1/4 cup cilantro, chopped (save half for garnish)
  • 1 sprig each thyme, oregano, rosemary, mint
  • Salt & pepper, to taste
Instructions
1. Remove the papery outer skin of the tomatillos and rinse well (they will be pretty sticky). Dry and chop in half.2. Place the tomatillos, peppers (remove seeds from the serranos if you're sensitive to heat), onions, and garlic in a saucepan and cover with water.3. Bring to a boil, lower flame and simmer for 5 minutes.4. Allow to cool off for a few minutes, until no longer piping hot.5. Drain but reserve the liquid, and place in blender/food processor. Add the fresh herbs, salt to taste and process for 30 seconds.6. If mixture is too thick, add reserved liquid and blend until incorporated.7. Garnish with remaining chopped scallions and cilantro.
Yield: approximately 10 servings

Monday, August 16, 2010

Homemade Flower Tortillas

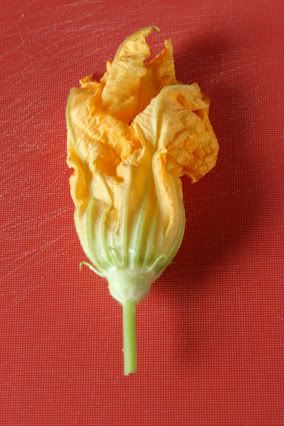
I love zucchini flowers. They're simply beautiful. And thankfully, easy to find if you go to the right farmers' market at the right time. (These are courtesy of the Friday morning Market near the Venice Library.)

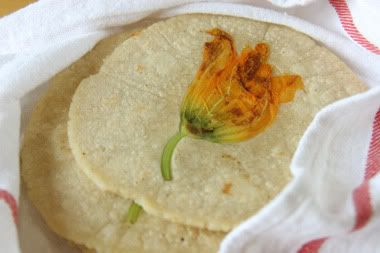
Typically you will find these pretty flowers stuffed with cheese and fried. Or cooked inside cheesy quesadillas. Very yum. But I wanted something slightly different. Last year I had a party at Rivera, a modern Latin cuisine restaurant in downtown LA. One of their signature dishes is the tortillas florales: tortillas with flowers pressed into them. And that's where the inspiration for these was born.

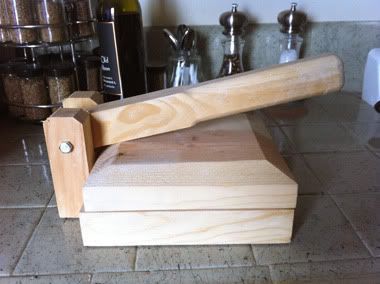
Corn tortillas are very easy to make, even if you're making them from scratch. I bought the pre-made masa at a local store, cutting out one step entirely. A tortilla press cuts down on the elbow grease too (though a rolling pin will do just fine). It's important to line the press with wax paper or plastic wrap to keep the tortillas from sticking. They'll peel off the quite easily this way.

A comal is handy for tortillas too, but you can use a skillet instead.

If you've ever pressed flowers in a book, you are already a tortilla making expert. That is exactly how these tortillas were made, right down to the pressed flowers!

A tip if you buy the blossoms but aren't going to use them immediately: put them in water, just like any other flowers. Store them in the fridge. They'll keep for a couple of days, instead of shriveling up within hours.


Flower Tortillas
Yields 10 tortillas, about 5-6 inches in diameter

1 lb prepared masa (tortilla dough)
10 zucchini flowers or other squash blossoms

1. Divide the dough into about 10 equal pieces and roll into balls.

2. Place a ball dough into the center of the tortilla press, and press down.

3. Open the press and place a flower in the center of the now flattened dough. Gently—the flowers are fragile—arrange so the leaves spread out slightly.

4. Press down again, but with only minimal force. You don't want to crush the flower, just embed it into the tortilla.

5. Cook the flattened dough in a hot skillet or comal over low heat for a few minutes on each side. The dough will become crispy and slightly golden. (You can also add a bit of cooking oil to the skillet and fry them instead. Your tastebuds will thank you but your arteries will not.) 

6. Put the tortillas in a plastic bag or wrapped in a tea towel to keep them pliable. Serve warm.
The tortillas will keep in the refrigerator for a few days. Put in a plastic ziplock bag and press out as much as the air as possible. To reheat, simply throw back on the skillet. Or, if you want to do it the way we always have in my house, throw on top of the burner over medium heat and flip with your bare fingers every few seconds until they are pliable again. Take care not to burn your fingers. G+F cannot be held responsible if you hurt yourself in the process.

The possibilities here are endless. You can press just about anything edible into a tortilla, or between two tortillas and create something closer to the Salvadorean pupusa. I personally like mine stuffed with cheese.

Now excuse me while I stuff my face with more flower tortillas. Mmm.

Saturday, July 24, 2010

Jalapeños en Escabeche

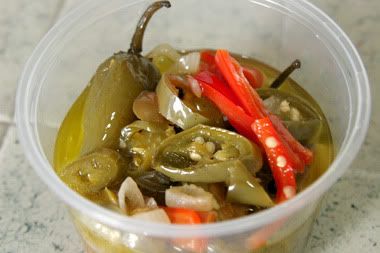
Simply put this is a pickled jalapeño dish. Depending on what part of the world you are in, escabeche can mean a variety of things, and spelled the same way it is pronounced a variety of ways. For our purposes, it's a vinegar and oil concoction of jalapeños.

My education on the subject started when I procured a small bag of the hot peppers. My mom suggested I make "un escabeche." Since I'm half-Mexican I should have known what that was. Instead (because I'm also half-not Mexican, or Mexican't) I Googled. And found a mess of recipes that called for sugar and vinegar and oil in varying quantities and a variety of added vegetables. My mom laughed at me and gave me her very simple breakdown:

Note: even though I put these in a plastic jar for a quick bit, they should be stored in glass or ceramic containers. The acid will leech the icky stuff out of the plastic and cause a third eye or something equally bad.

Rosita's Jalapeño Escabeche 
Yields about 1-4 pints, depending on additional vegetables

1/2 pound jalapeños
1/3 cup oil
1/2 cup vinegar (apple cider is a good choice)
1 cup water
4 cloves garlic, peeled and smashed (but kept whole)
1 shallot, thinly sliced
5-10 leaves of fresh oregano
5-10 black peppercorns (This was my father's contribution to the recipe. He is also not-Mexican.)
Optional ingredients: 1-2 carrots, handful of cauliflower florets, a small onion, etc (I only wanted to concentrate on the jalapeños, so I left all these out.)

1. Prepare the jalapeños any which way you want to preserve them. If you opt to keep them whole, cut a small X in the bottom of the pepper to allow the liquid to penetrate the insides. (As you can see from the picture, I kept some intact, sliced others).

2. Do a self-assessment. If you're heat-intolerant, you may want to discard the seeds. I did not follow my own advice here. The half-Mexican part of me took over the half-not Mexican and left ALL the seeds in.

3. Put all the ingredients in a sauce pan and bring to a boil. Open all the windows, and keep the hood fan running because boiled vinegar is pungent.

4. Once the boiling point is reached, simmer uncovered for an hour.

5. Enjoy the pungent smell of vinegar. Or go sit outside. This step is open to interpretation, but you do have an hour to kill. I chose to talk to my mom on the phone about how my Mexican side was showing itself. She was very proud.

6. Cool your concoction then store it in a glass or ceramic container. You can put in pickling jars and do a hot water bath. They'll supposedly last longer (about a month) in the fridge. Mine have been in the fridge for a week in a simple glass container and they're already half gone. So your mileage may vary.

The liquid from this recipe can also be used separately. I've used it on pizza dough to give it a golden brown crust with a spicy kick. Or as a simple spicy vinaigrette. The options are endless.

Wednesday, July 21, 2010

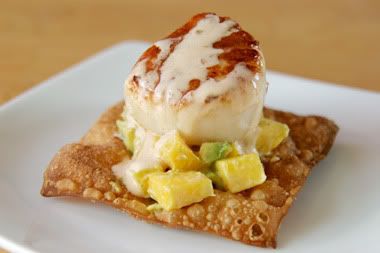
Caramelized Scallops on a Wonton Tostada

Today's dinner was courtesy of Food Gal's Thomas Keller "Ad Hoc at Home" preview, with some inspiration drawn from Brian Boitano's scallops with mango and avocado. Who knew Brian Boitano cooked, right?

I had no idea scallops could be caramelized. I'm always afraid of overcooking them. That happened to me once in a teppanyaki restaurant and it was so very disappointing. Rubber seafood is about as bad as it comes. Worse than rubber chicken.

Reading through Food Gal's comments I found that the original recipe of 10 total of water cups and the cup of salt could be halved, especially since I was only making a small test batch just for me. I pretty much followed the directions exactly, except for using table salt (at a ratio of 2/3 cup of table salt = 1 cup kosher salt) and only having the 4 scallops instead of a pound. I also cooked them in a cast iron skillet. They came out perfectly.

It's important to note that if you attempt this dish, you should definitely read Food Gal's post first. She does a great job explaining the entire recipe.

As for the mango/avocado/wonton piece of the puzzle, I upped the Mexican factor on this. Hence the "tostada" part of the title. Brian's recipe was a great start, but I didn't want to use coconut milk. It's super fatty and I wanted something a bit more savory. In keeping with the Mexican theme, I opted for Mexican crema, which is similar to sour cream, but more liquid-like. And instead of the recommended Sriracha, I subbed in adobo sauce. Adobo (not the brand name salt & pepper mix I also used) is the sauce that canned chipotles live in. Depending on your heat tolerance, a little goes a long way. (Both Adobo and canned chipotle are available in Hispanic markets.)

This was also my first time making clarified butter for the sear. It's readily available in southeast Asian stores, but it's so simple to make, and I only needed a small amount, that I tried my hand at it. For details on how to make it, see the Asia Recipe website.

Finally, I didn't see the point in cutting the wonton wrappers into circles, so I simply fried them as squares. Yes tostadas are circular, but that's just an unnecessary step.

The sear on the scallops was unreal. And they were perfectly cooked, no rubber!

The combined recipe below was scaled down for a single serving.

Caramelized Scallops with Mango Avocado Relish over a Wonton Tostada

1/3 cup table, plus more to taste
2 cups hot water
4 cups cold water
4 jumbo scallops, tough side muscle removed from each one
About 2 tablespoons (1 ounce) clarified butter
1/2 lemon (optional)
2 cups canola oil
4 wonton wrappers
Adobo salt & pepper mix, as needed
1/4 mango, small diced
1/4 avocado, small diced
2 tablespoons crema (Mexican sour cream)
1/2 teaspoon adobo sauce (aka chipotle sauce)
1/2 lime, juiced

1. Line a small baking sheet with paper towels. Combine the 1/3 cup salt with hot water in a large bowl, stirring to dissolve the salt. Add the cold water.

2. Add scallops to the brine and let stand for 10 minutes.

3. Drain the scallops, rinse under cold water, and arrange in a single layer on the baking sheet. Cover with more paper towels and refrigerate for 1 1/2 to 3 hours (no longer, or the quality of the scallops will be affected).

4. While scallops are resting in the fridge, work on the relish and tostadas. In a medium pot, bring 2 cups canola oil to 350 degrees F. Fry the wontons in small batches until they are brown and crispy, about 2 minutes. Drain on a plate lined with a paper towel and season each with a bit of salt.

5. In a medium bowl, combine the diced mango and avocado. In another smaller bowl, whisk together the crema, hot sauce, and lime juice, and adjust the seasoning with the salt and black pepper mix, to taste. Pour half of the creamy mixture over the mango and avocado and gently toss to coat.

6. After the 1 1/2 to 3 hour rest period, heat a generous film of clarified butter in a large cast iron frying pan over medium-high heat until it ripples and begins to smoke. Sprinkle scallops lightly with salt and add them to the pan. Cook, without moving the scallops, until bottoms are a rich golden brown, 3 to 3 1/2 minutes. Turn scallops and caramelize the second side.

7. To assemble, put 1 tablespoon of the mango and avocado mixture onto a fried wonton. Top with a caramelized scallop and finish with a squeeze of lemon juice (optional) and a drizzle of the crema sauce.

This looked like a LOT of food on the plate. But when I was done, I wanted more. I don't know if it was just too little food, or it was so good it left me wanting more. I'm going with the latter.

Wednesday, May 5, 2010

Birthday with a Chef

My mom and I are both fans of Aarón Sanchez, the resident Mexican chef on The Food Network. And it just so happened that Food Network Magazine was hosting a pre-Cinco de Mayo event in LA the same night as mom's birthday.

The event was held at The Spanish Kitchen in West Hollywood. The place was not overwhelmingly packed, and everyone was very friendly as we shared tables over nouveau Mexican food. But the crowning moment of the evening was getting to meet Aarón and his wife Ife.


The stereotypical chef ego was nowhere to be found here. Aarón and Ife are two of the most down to earth people I've ever met. They were so genuinely nice and gracious throughout the evening, Aarón even went around to all the tables thanking everyone for coming. He then ended up at our table for about 10 minutes chatting about Puerto Rican cooking with my parents and joking with my dad about how in New York, Puerto Rico is considered the sixth borough.

It was a great way to celebrate mom's birthday.

Monday, March 15, 2010

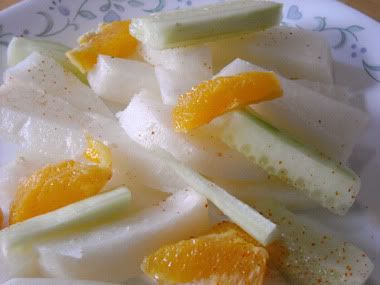
Sunday Brunch: Jicama Salad

I had invited my parents over for brunch and I wanted to keep it light. I actually made more than this (including pork medallions with sauteed cabbage and apples) but I forgot to take pictures. Oops. Again.

This is the type of dish you may find at some Mexican restaurants, the kind that don't serve chips and salsa as the freebie starter. We used to have one here in Culver City--and not to name drop, but I once ran into Jed the Fish there, his voice is unmistakable--but they tore it down and made it a nouveau Mexican chain restaurant instead. I'm guessing they abandoned the jicama for chips. It's what Americans expect, after all.

This is even simpler than the chocolate hummus because all this requires is a peeler and a knife. Or a mandoline, but I didn't have one at the time.


Jicama Salad
1 jicama, pared
1 cucumber, pared
1 orange, sectioned
Chile lemon salt (to taste)

Peel and cut the jicama and cucumber into spears. Peel and section the orange. Sprinkle the chile lemon salt over the entire plate, to taste. Serve immediately, or chill in the fridge.

My mother, who is originally from Guadalajara, Mexico, has always referred to this as pico de gallo, which perplexes people who are used to the tomato/onion/cilantro concoction you find in American restaurants. Wikipedia explains the subtle differences.